Introduction
Welcome!
Goal of this guide is to fix the abysmal performance in Skyrim Special Edition by using more modern technologies and tweaks, and make you generally aware of its quirks and other potential issues.The guide is mostly written with an assumption that you've completed Utilities sections from A Dragonborn's Fate.
While the guide is focused on this particular game, most stuff shown here is applicable to other games.
Terminology
Things You Should Know
-
Vertical Synchronization (V-Sync) - technology allowing to keep display's scanout and refresh in phase to eliminate screen tearing,
at the cost of higher latency.
(Latency lowers along with refresh rate) - G-Sync | Freesync - Variable Refresh Rate (VRR) technologies developed by NVIDIA and AMD respectively. They allow the display to adapt its refresh rate to the framerate, allowing to use V-Sync at arbitrary framerates and reduce its latency[1] .
- Multiplane Overlays (MPOs) - hardware scanout planes for the GPU. They allow for hardware image composition without any latency or performance penalty (for example displaying windows on top of each other), as well as their hardware scaling and stretching. MPOs are supported since Windows 8.1. Hardware capabilities vary between GPU manufacturers.
-
Input Latency (lag) - time between input event (mouse click, keyboard press) and the event being displayed on the screen. The lower the latency, the more responsive the game feels.
There are multiple sources of latency, varying from GPU/CPU usage, display mode, framerate count and many more - most of them are covered in this guide.
- Yes, despite popular misinformation, VRR alone doesn't get rid of tearing. It can minimize the rolling tear however, but that varies between displays, and such, it's not a guaranteed feature. Additionally, the latency reduction applies only at framerates below V-Sync window (display's native refresh rate) - if framerate matches the native refresh rate, VRR engages V-Sync emulation.
Technicalities
More text inside. Explains the concept of presentation models and display modes. While not needed to use the guide, it'll help you with understanding why things are the way they are.Graphics Drivers and Windows
Driver Updates
Not much to say here - for the best compatibility and performance, you must be using the newest driver for your graphics card.
You can check what GPU you have by opening Task Manager, and going to the Performance tab - the last GPU on the left pane is your main one.
Select your graphics card to go the driver download page |
||
|---|---|---|
Windows Watermark
You can ignore this section if you have following GPUs:
- Nvidia 16 series and newer
- AMD Vega and newer (single display only)
- Intel CPUs 8th Gen and newer
Make sure your Windows is activated, otherwise the watermark will kick the game into the DWM composition, which leads to increased latency, worse performance and disables VRR.
If you don't have a GPU with MPO (Multiplane Overlay) support, you can mitigate this by disabling Fullscreen Optimizations.
(Keep in mind that this trick won't work on modern, D3D12 games, so it's still recommended to just activate Windows)
How to check if your GPU supports MPOs:
- Type dxdiag into Windows search
- Click Save All Information and save the file.
- Open the DxDiag.txt file, press Ctrl+F and look for MPO MaxPlanes
- If the number is greater than 1, then your GPU has MPO support.
Having the watermark without MPOs will disable VRR and increase input latency and stuttering!
Virtualization
Windows 11 uses virtualization features to increase system and inter-process security. Unfortunately, this can come at a performance cost, especially on lower-end hardware.I won't be writing on how to disable them, because... Microsoft already made a tutorial about it.
This step is not mandatory, as when it comes to security, it's up to you to decide. Just letting you know that this exists, and even Microsoft acknowledges the fact that it can degrade perfomance.
Game Mode
Windows 10 introduced a feature called Game Mode, which puts the system in a more gaming-friendly state.Game Mode features:
- Enables AutoHDR for DXGI based games.
- Enables VRR optimizations for games using Flip Model [?].
- Disables Windows Update.
- Disables notifications.
- Disables file indexing, if "Respect Device Power Mode Settings" is enabled in Search settings.
- Sets Game Mode power mode (Requires Balanced power plan to be active).
- Enables CPU scheduling optimizations for Ryzen CPUs.
Game Mode is enabled by default. If you had it disabled for some reason, you can enable it here.
Display Mode Differences
Presentation Problems
Here's a comparison of three display modes you can use in this game.
Flip Windowed
|
Fullscreen |
BitBlt Windowed
|
|---|---|---|
|
|
|
|
|
|
- Despite that disabled V-Sync unlocks the framerate, window itself is V-Synced, so you don't get any benefits.
-
While AMD enables Freesync for Fullscreen Windowed BitBlt surfaces, Nvidia allows G-Sync to run with any window.
This is problematic because refresh rate can get synchronized to wrong windows, framerate may break on other displays and display stutters may occur.
Enabling it globally is a bad idea, because it disrupts normal desktop usage (e.g. screen can sync to sleeping windows).
It's recommended to use Nvidia Profile Inspector to set G-Sync Application Mode to "Fullscreen and Windowed" in Skyrim Special Edition profile. This makes Windowed G-Sync run only when the game is running.
Keep in mind that even with this method, this G-Sync implementation is still buggy - if you get any of the forementioned issues, disable it.
Never enable Windowed G-Sync globally!
Recommended FPS Limiters and Their Configurations
(Not) Pushing the Limits
Limiting framerate is very important for overall stability.First and foremost, if you are using a good limiter, you'll be implementing correct framepacing, which is the most important think for the overall feel of fluidity.
More advanced limiters can also reduce latency or power consumption (it's difficult to have both).
Always limit your framerate to an amount you can actually achieve, otherwise you won't get any benefits!
Letting your GPU overwork itself has a big latency impact, so try to cap your framerate at such value, where your GPU doesn't sit at constant 100% usage.
Running at smoother, lower framerate is always better than high, albeit laggy and stuttery one.
Recommended Setups
Recommended configurations based on selected display scenarios:-
V-Sync
- Framerate must be capped slightly below refresh rate to reduce latency.
V-Sync on its own is NOT a limiter. Using it as one introduces a massive latency penalty.
This workaround applies only to RTSS.
(Not needed if you use Special K)
Driver limiters are not precise enough to pull this off without risking stutter. -
G-Sync | Freesync
- V-Sync must be enabled, in order to fully get rid of tearing.
- Framerate must be capped below refresh rate, in order for VRR to not disengage and fallback to V-Sync, as this causes a very big increase in latency.
-
No V-Sync
- No special prerequisites.
So many options...
Limiters presented here are ordered by their precision, from best to acceptable. The better ones are smoother and can provide better latency reductions, but may have some compatibility issues.Enter your refresh rate here for automatic calculation of FPS limits. You can find your exact refresh rate here.
If you don't use, or not have VRR, it's best to limit your framerate to fractions of your refresh rate. (30 at 60hz, 72 at 144hz, etc.)
Click on the cards below to show the instructions for each limiter.
Special K
Special K is a mod by Kaldaien focused mainly on fixing performance in games and implementing HDR.Its list of features is too long to write here, but the most important one used here is its incredibly versatile limiter, HDR, texture cache, and (almost) lagless V-Sync.
Warning!
- Special K may conflict with Riva Tuner. If the game crashes or SK doesn't show up in game, in RTSS settings, enable Use Microsoft Detours API hooking, or set injection delay to 30000
- Special K is not compatible with ENB.
- Special K includes its own Nvidia Reflex implementation, so the dedicated mod is not needed.
- The following configuration will override some Display Tweaks settings (like V-Sync, buffer count, etc.).
Calculated values are not provided because Special K already does that automatically, and with higher precision.
Installation
- Download the Special K Archive from the Stable section, then extract SpecialK64.dll to your Skyrim SE root folder and rename it to dinput8.dll
- Download the archive with preconfigured settings and extract its content to your root folder.
- Launch Skyrim and press Ctrl + Shift + Backspace to enter Special K Control Panel.
-
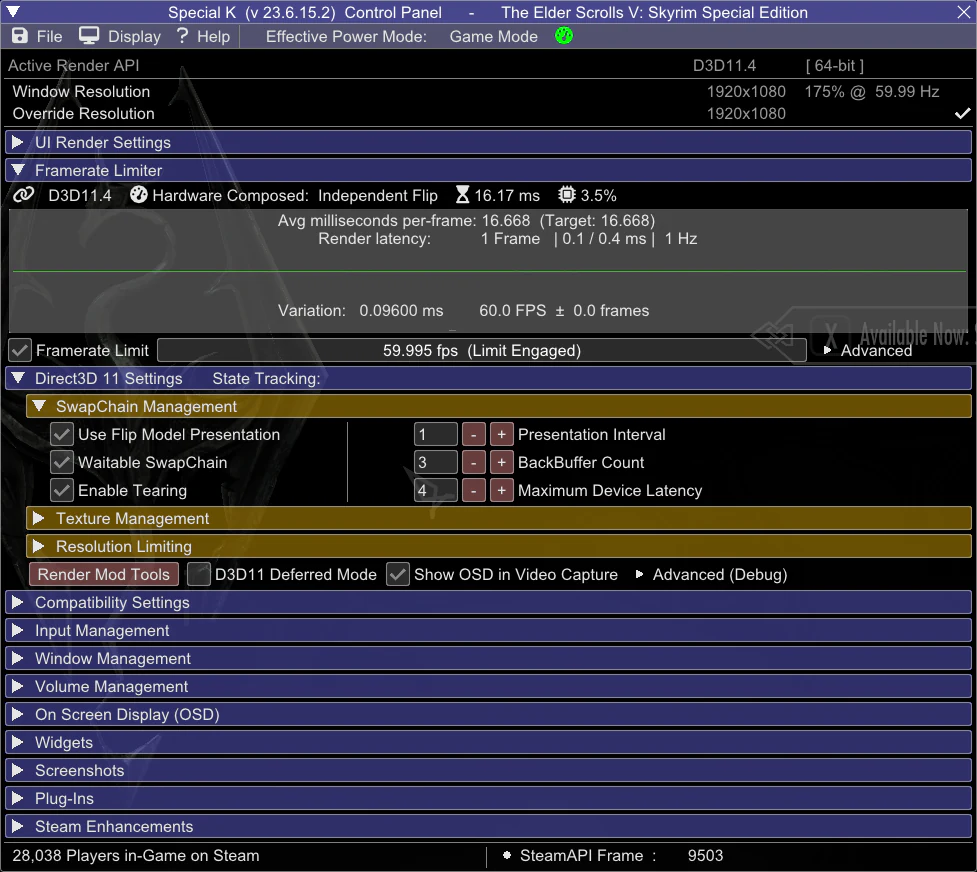
Enable the Framerate Limit by ticking the checkbox, then right click on the bar (not graph) next to it:
-
No V-Sync
In right click menu select your refresh rate
Click on Advanced and select the Latent Sync (VSYNC -Off-) modeOptional - Configuring Latent Sync to get rid of tears

-
V-Sync
In right click menu select your refresh rate.
-
VRR + V-Sync
In right click menu select VRR Bias and select the highest value.
- The bias option is not needed for lower values.
-
No V-Sync
Your configuration should look similar to this:
RivaTuner Statistics Server
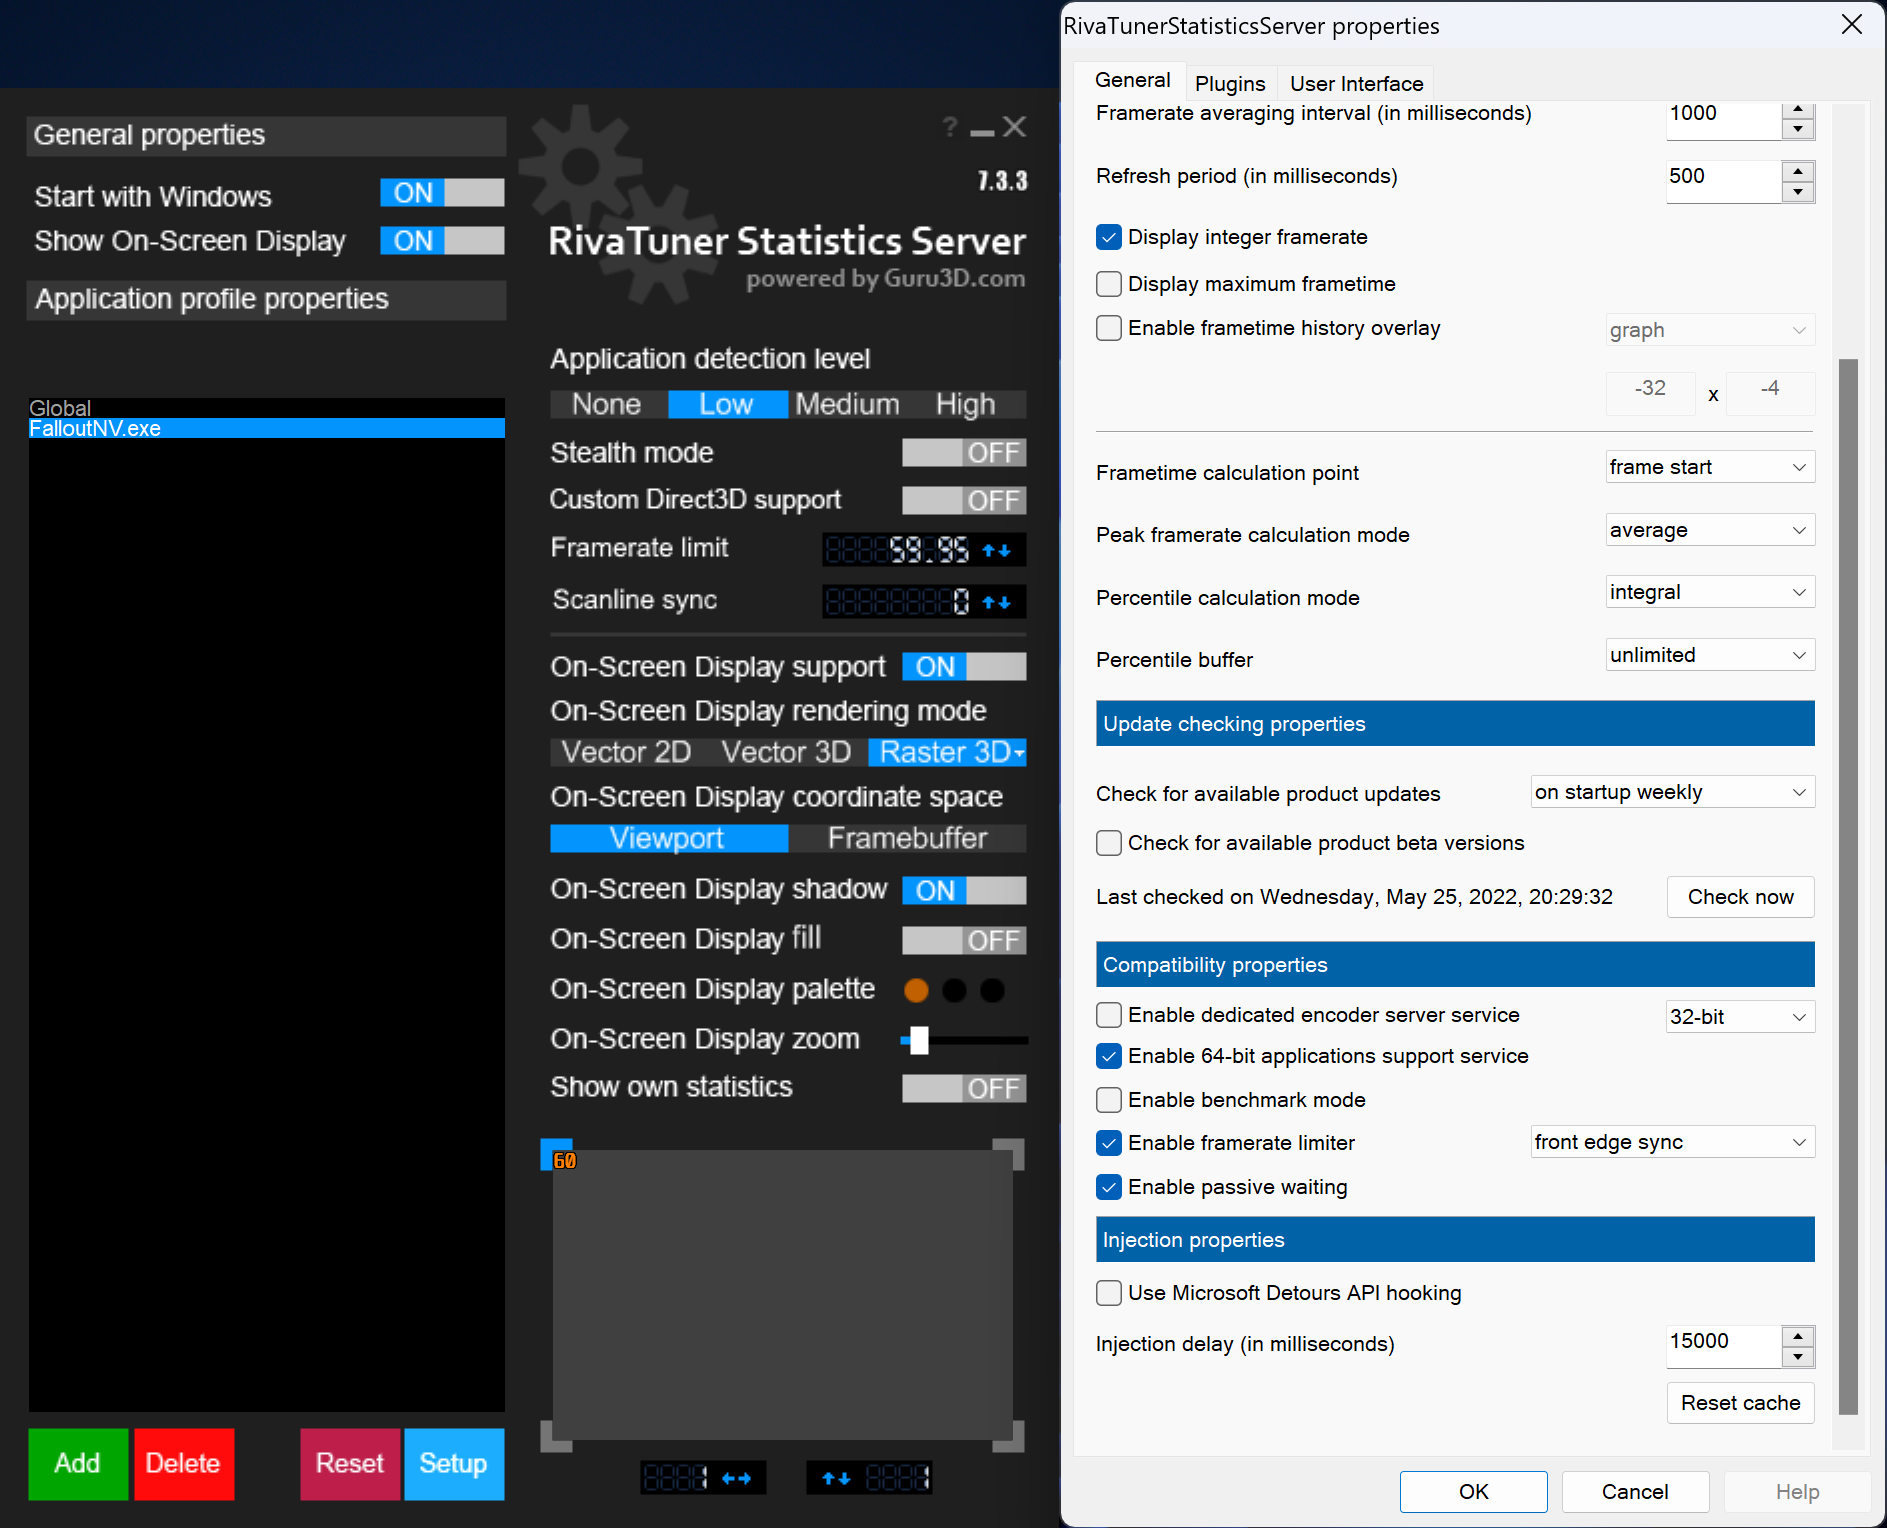
Riva Tuner Statistic Server by Unwinder is probably the most famous FPS Limiter and OSD software, thanks to its performance, compatibility and power usage.Installation
- Install and launch RTSS. Open your System Tray (the triangle pointing upwards on the taskbar) and click on the RTSS icon to open it
- Press green Add button and select SkyrimSE.exe
- Set Application Detection Level to Low
-
Set Framerate Limit to:
-
No V-Sync
(RefreshRate)
-
V-Sync
(RefreshRate - 0.05)
-
VRR + V-Sync
(RefreshRate * (1 - RefreshRate * 0.00028))
-
No V-Sync
-
Enter settings using Setup button and:
- Enable Passive Waiting
- Set framerate limiter to Front Edge Sync
- Enable Start with Windows or launch RTSS everytime before you play
Your configuration should look similar to this:
NVIDIA | AMD driver
The most basic limiters from this list, but definitely the easiest and fastest to set up!
NVIDIA
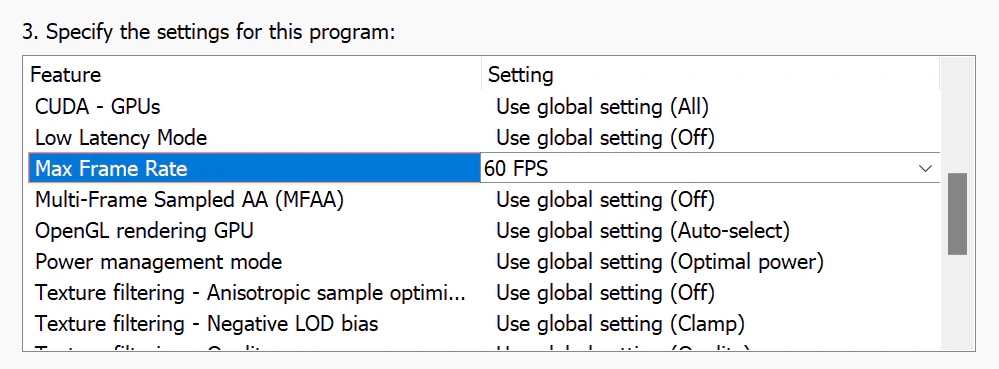
Configuration
- Open NVIDIA Control Panel, go to Program Settings
- Select SkyrimSE.exe. If it's not present, add it manually
-
In settings, set Max Frame Rate to:
-
V-Sync | No V-Sync
(RefreshRate)
-
VRR + V-Sync
(RefreshRate * (1 - RefreshRate * 0.00028))
-
V-Sync | No V-Sync
- Click Apply
Your configuration should look similar to this:
AMD
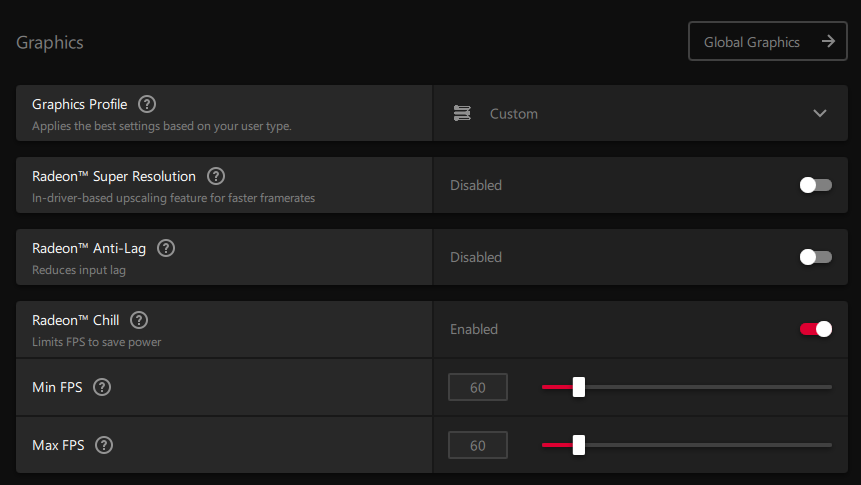
Configuration
- Open AMD Software: Adrenaline Edition, go to Gaming tab
- Select SkyrimSE or search for it in the bar. If not present, click on the three dots and add the executable manually.
-
In games's menu, enable Radeon Chill™️ and set Max FPS to:
-
V-Sync | No V-Sync
(RefreshRate)
-
VRR + V-Sync
(RefreshRate * (1 - RefreshRate * 0.00028))
-
V-Sync | No V-Sync
Your configuration should look similar to this:
FAQ
Are these questions really frequent?
-
Do texture mods really have an impact on performance?
Not directly, no. As long as you don't go over your VRAM budget you'll be fine. If you run out of VRAM, you'll either crash, or experience massive stutters.
What is guaranteed from higher resolution textures is increase in their load time. This can translate into longer stutter periods on cell loads. -
What about DLSS, FSR and XeSS?
Skyrim Upscaler is a great mod if you are looking to improve GPU performance thanks to it's upscaling, but the current implementation of both the mod and the technologies leaves us with just DLSS and DLAA as the viable options. This is because XeSS and FSR have severe ghosting issues.
If you do want to use DLSS, keep these points in mind:- DLSS is only available for the NVidia RTX graphics cards (2000 series and above).
- DLSS is what allows you get better GPU performance and anti-aliasing, DLAA is a mode that gets rid of the upscaling part and flips that around, leading to a far better AA than normal DLSS (which would still be better than the vanilla TAA) with a small performance cost.
- There are various presets available in the configuration file for Skyrim Upscaler, these will change the visual result. Fiddle with them until you find a good balance.
- Skyrim Upscaler is currently pay-walled if you wish to use with ENB, but the free version on Nexus works totally fine with Community Shaders (which is highly recommended as alternative).
Finish
The End?
Congratulations! You've made it through! I hope this guide has helped you making Skyrim Special Edition a smoother experience.If you have any issues, questions, critiques or recommendations hit us up on Discord - wall_sogb and VishVadeva.
You can also find us on ModdingLinked, r/skyrimmods, Community Shaders servers.
I recommend checking this guide from time to time - We're not done yet.
If you found this guide helpful, share it with others or support me on Ko-Fi or Patreon
Things worth reading
Here are some links to stuff that I recommend checking out:- PCGamingWiki - Great website, contains really helpful info about games, patches, fixes and other PC gaming related stuff.
- BlurBusters - Amazing website by Mark Rejhon focused on displays, latency and image quality. Really worth checking it out if you are a geek for these things.